Procedures below are replaced with the MN039 license
If you do not have the latest software licenses, or you will have to do some mechanical work. Unit needs to be opened, and ABProg programmer is used, SET088 is recommended, with that, you can do the following:
-
Read FBS4 data from VGS4 NAG2 modules
-
Set VGS4 NAG2 modules to virgin state - ZN130 ABProg programmer or SET088 required
-
Write FBS4 personalization data to the TCU
If MN034 license is active, personalization procedure can be executed via OBDII and internal CAN connection. Personalization without previously saved FBS data is also available!
SET088 has ABProg programmer, and it is recommended when working with the VGS4-0-NAG2 TCUs.
We are aware of 2 types or generations of VGS4NAG2 units, which have different type of connectors and PCBs: VGS4-0 NAG2 (Type 1), and VGS4-500 NAG2 (Type 2)
NOTE: Once you cut open the TCU, remove the jelly very gently only where you need to connect (or solder), to avoid damage to the unit!
After you complete the task, make sure you close the TCU pcb well, and glue the cover so no oil can enter and damage the unit!
NB! Make sure your ABPRrog programmer is updated with the latest firmware.
Important: In some cases the TCU will remain in a state that does not let you operate with it, once the “Info” button is pressed, power consumption will drastically drop. In this situation you have to turn OFF the power supply and turn it back ON right away. Power consumption will remain below 0.2A (0.16-0.19) and this is the state when the TCU will respond normally to the software. The SET088 contains all the necessary hardware tools to open and connect to the 7G-Tronic VGS4-0 NAG2 in FBS4 vehicles. This set allows you to open the transmission control unit and connect to the required points without soldering. The set in combination with the MN035 license offers a great way to reuse second-hand modules in FBS4 vehicles, enabling you to reset the donor module, and adapt it into the vehicle.
Functionalities
-
Open the transmission control unit type 7G-Tronic VGS4-0 NAG2
-
Connect to the correct points on the module’s PCB using a custom designated adapter
Supported vehicles
- All vehicles with VGS4-0 NAG2 7G-Tronic TCU of the FBS4/DAS4 generation Mercedes-Benz
Contents of the set
-
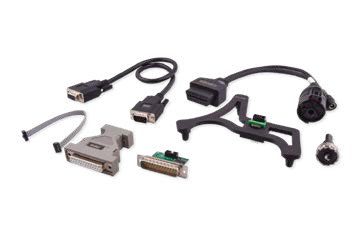
ZN088 - 7G-Tronic VGS4-0 NAG2 FBS4 Solder-Free Connection Adapter
-
CB088 - 7G-Tronic VGS2/3/4-0 NAG2 FBS3/FBS4 Direct CAN BUS Connection Cable
-
ZN130 – Abprog
-
ZN090 - JTAG Adapter For ABPROG
-
MT001 – Custom drill head
-
CB101 - AVDI extension cable for ABPROG
N.B: ZN090 has 2 LEDs, 1 indicates that connection with the TCU is established (target) and the other indicates the connection to ABPROG is established. You need to have them both ON, so that you can proceed to working with the TCU.
Type 1: VGS4-0-NAG2
Read FBS data is available in 2 ways
-
By OBDII (with active MN032)
-
By ABProg (with active MN035)
Read and save VGS4-0-NAG2 FBS data procedure
-
Connect to the unit (connections explained below)
-
Open the Mercedes FBS4 software
-
Select TCU
-
Press “Info” button to establish connection
-
Press “Save” button to read and save the FBS data
Once the reading is complete and the file is saved, please make sure you also make a back-up of the Configuration data of the unit as follows: TCU > “Utilities”> “Save All Config Data. This data together with the FBS4 data will let you personalize a unit.
Additionally, write down the software version of the original TCU and it’s VIN in a text file as a backup.
Connections
-
In the vehicle by OBDII and internal CAN (diagnostic CAN)
-
On bench with the use of CB088 - 7G-Tronic Direct CAN BUS Connection Cable and 12v power supply - ZN074 set is recommended.
-
By ABProg - you can either solder to the PCB or use the SET088 solder free solution, and the procedure requires a bit of mechanical work too, check connections HERE
Set the unit to virgin state (required if you are using a second hand donor unit)
This procedure is executed only on bench and with the use of an ABProg programmer. SET088 is recommended and MN035 license
Procedure
-
Connect to the TCU - please check connections HERE
-
Open the Mercedes FBS4 Software and select TCU
-
Press “Info” button to check the status of the unit and establish connection
-
Press “Virgin” button to set the unit to virgin state
-
Once complete, the unit will be ready for personalization
Personalization available in 2 ways
-
By OBDII and internal CAN (with active MN034)
-
By ABProg (with active MN035)
Here is how to execute the procedure
-
Connect to the unit (connections explained below)
-
Open the Mercedes FBS4 software and select TCU
-
Press “Info” button to establish connection
-
Press “Personalize” and select the file with the saved FBS data from the original TCU
-
Program the configuration data by pressing the “Utilities” then “Program All Config Data” and use the files saved from the original TCU.
-
Set the VIN
-
Use the “Program” button in case you need to align software versions
Connections
-
In the vehicle by OBDII and internal CAN (diagnostic CAN)
-
On bench with the use of CB088 - 7G-Tronic Direct CAN BUS Connection Cable and 12v power supply - ZN074 set is recommended.
-
By ABProg - you can either solder to the PCB or use the SET088 solder free solution, and the procedure requires a bit of mechanical work too, check connections HERE
Watch video HERE
VGS4-0-NAG2 Connection ABProg or SET088
-
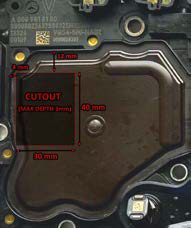
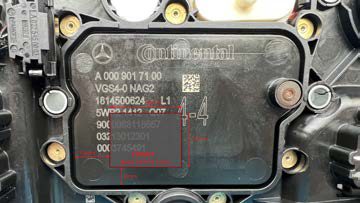
Cut open the TCU - We suggest you use the dedicated tool in the SET88, which has a template, or check picture below.
-
Connect to the specific PCB PINs
-
Option 1: by soldering wires to the specific points on the TCU (diagrams below)
-
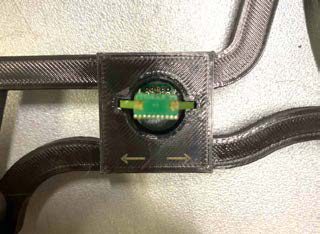
Option 2: with the needle set adapter ZN088
- Connect to the ABProg programmer
-
Option 1: DIY connector explained in the dedicated section
-
Option 2: ribbon cable from the SET88 is connected to the ZN088 and to the ZN090, then ZN090 is connected to ABProg
-
Connect ABProg programmer to AVDI directly or with CB101
-
Connect AVDI to the Laptop via CB104 USB Cable
-
Connect to the TCU connector
-
Option 1: DIY DB25 connector for VGS4NAG2
-
Option 2: CB088 or the dedicated cable from the CB011 set.
- Power up the set with 12v DC
We suggest the power adapter from the ZN074 set and connect it to the CB088 cable from the SET88.
- Start the software
Important: Once you cut open the TCU, remove the jelly very gently only where you need to solder, to avoid damage!
N.B! Please note that there are some variations of these units, and if the unit is not readable when the needles of the ZN088 are connected, you will have to switch the position to the other side.
Examples of where yo cut open the unit and a connection by soldering.
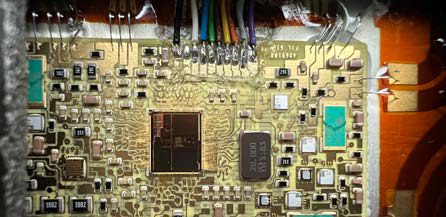
DIY DB25 connector - Here is how you can make your DIY connector with a DB25 and the corresponding wires to solder to the TCUs PCB for VGS4-0 NAG2 PCB TYPE 1
DB25 connector is connected to the ZN130 ABProg programmer.
It is very important to pay attention to the specifications on the wired for this connection. Also, it is important that you use isolated wires for that connection.
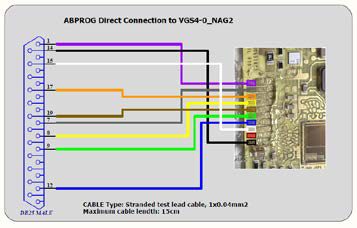
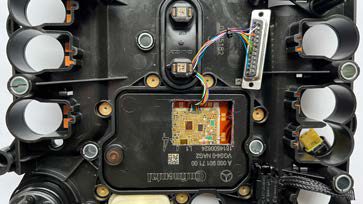
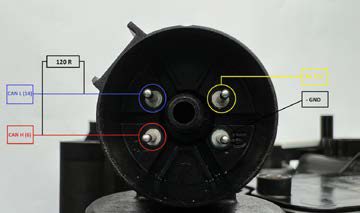
Here is how to connect to the unit with CB088 or a DIY connection:
DIY connection for VGS4-0-NAG2 and DB25 to AVDI
-
PIN 1 TCU Connector CAN H > PIN 7 DB 25 (to AVDI)
-
PIN 2 TCU Connector CAN L > PIN 15 DB25 (to AVDI)
-
PIN 4 TCU Connector 12V+ > PIN 17 DB25 (to AVDI)
-
PIN 5 TCU Connector GND > PIN 5 DB25 (to AVDI)
Resistor R120 Ohm between CAN H and CAN L
Power supply 13.6V power supply is required!
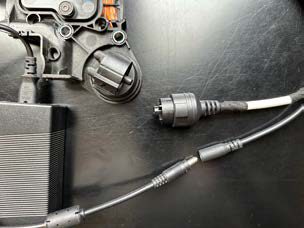
Type 2 : VGS4-500-NAG2
Read FBS data is available in 2 ways
-
By OBDII (with active MN032)
-
By ABProg (with active MN035)
Read and save VGS4-500-NAG2 FBS data procedure
-
Connect to the unit (connections explained below)
-
Open the Mercedes FBS4 software
-
Select TCU
-
Press “Info” button to establish connection
-
Press “Save” button to read and save the FBS data
Once the reading is complete and the file is saved, please make sure you also make a back-up of the Configuration data of the unit as follows: TCU > “Utilities”> “Save All Config Data. This data together with the FBS4 data will let you personalize a unit.
Additionally, write down the software version of the original TCU and it’s VIN in a text file as a backup.
Connections
-
In the vehicle by OBDII and internal CAN (diagnostic CAN)
-
On bench with the use of ZN151 or ZN151 and CB403 (diagram available below)
-
By ABProg - procedure requires a bit of mechanical work too, check connections HERE
Set the unit to virgin state (required if you are using a second hand donor unit)
This procedure is executed only on bench and with the use of an ABProg programmer.
Procedure
-
Connect to the TCU - please check connections HERE
-
Open the Mercedes FBS4 Software and select TCU
-
Press “Info” button to check the status of the unit and establish connection
-
Press “Virgin” button to set the unit to virgin state
-
Once complete, the unit will be ready for personalization
Personalization available in 2 ways
-
By OBDII (with active MN034)
-
By ABProg (with active MN035)
Here is how to execute the procedure
-
Connect to the unit (connections explained below)
-
Open the Mercedes FBS4 software and select TCU
-
Press “Info” button to establish connection
-
Press “Personalize” and select the file with the saved FBS data from the original TCU
-
Program the configuration data by pressing the “Utilities” then “Program All Config Data” and use the files saved from the original TCU.
-
Set the VIN
-
Use the “Program” button in case you need to align software versions
Connections
-
In the vehicle by OBDII and internal CAN (diagnostic CAN)
-
On bench with the use of ZN151 or ZN151 and CB403 (diagram available below)
-
By ABProg - please check connections HERE
Watch video HERE
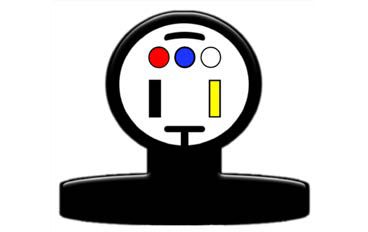
Here is how to make a DIY connector with a DB25 that connects to AVDI as follows:
-
TCU connector CAN L > PIN 15 DB25 (to AVDI)
-
TCU connector CAN H > PIN 7 DB 25 (to AVDI)
-
TCU Connector B+ 12V > PIN 17 DB25 (to AVDI)
-
TCU connector GND- > PIN 5 DB25 (to AVDI)
Resistor R120 Ohm between CAN H and CAN L
Power supply 12V DC to the connector
DIY DB25 connector for VGS4-500-NAG2
Here is how you can make your DIY connector with a DB25 and the corresponding wires to solder to the TCUs PCB for VGS4NAG2 PCB (VGS4-500-NAG2) TYPE 2
DB25 connector is connected to the ZN130 ABProg programmer.
It is very important to pay attention to the specifications on the wired for this connection. Also, it is important that you use isolated wires for that connection.
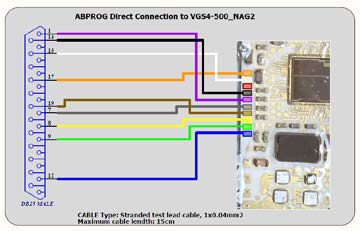
Here is where you have to cup open the plastic cover of the TCU in order to get access to the PCB for ABProg connection.