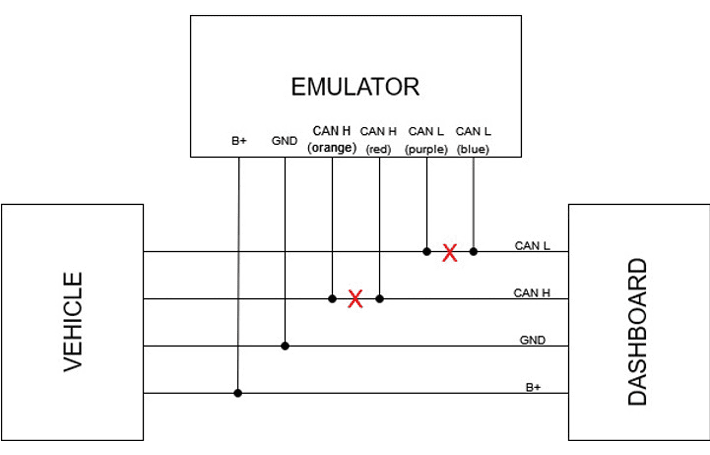
Our new development has the main task of filtering the communication between your vehicle and its dashboard, and is dedicated to vehicles from the MQB and MLB platforms. To elaborate on that, the car sends data to the dashboard and the filter modifies the data that reaches the dashboard unit, thus the dashboard unit displays the modified data.
The filter can pass the data through with coefficient of 20%, 30%, 40% or 50%, so if the true data value is 100 units, the filtered data that would reach the dashboard unit is correspondingly 20, 30, 40, or 50 units.
It is installed behind the dashboard with the following guidelines
-
Blue – CAN L to Dashboard
-
Red – CAH H to Dashboard
-
Purple – CAN L to Vehicle
-
Orange – CAN H to Vehicle
-
Black – GND
-
Yellow – 12v+
Below you can see the way it needs to be connected and on the next page you can read the details about the installation and colors of wires in the vehicle that you are looking for.
Below you may read about the different types of connectors you will find in the vehicles the emulator works for. PIN connections and wires’ colors are desctibed:
MQB 18 PIN Connector
PIN 1 - 12V ( + ) or “terminal 30 “ - black and yellow wire
PIN 10 - GND ( - ) or “terminal 31“ - brown wire
PIN 17 - CAN L - orange and brown wire
PIN 18 - CAN H - orange and green wire
Only on Audi Q3 you can find a difference, here are the details
-
32 PIN Connector
-
PIN 16 - GND ( - ) or “terminal 31“ - brown wire
-
PIN 28 - CAN H - orange and blue wire
-
PIN 29 - CAN L - orange and brown wire
-
PIN 32 - 12V ( + ) or “terminal 30“ - red and black wire
MLB: 32 PIN Connector
PIN 3 - CAN L - orange and brown wire
PIN 4 - CAN H - orange and blue wire
PIN 30 - GND ( - ) or “terminal 31“ - brown wire
PIN 31 - 12v ( + ) or “terminal 30“ - yellow and red wire
Setting the device – you can set the reducing coefficient of the device trough the buttons of the steering wheel of your vehicle. We advise that you do the setting when the engine is turned off, and you have the Ignition ON.
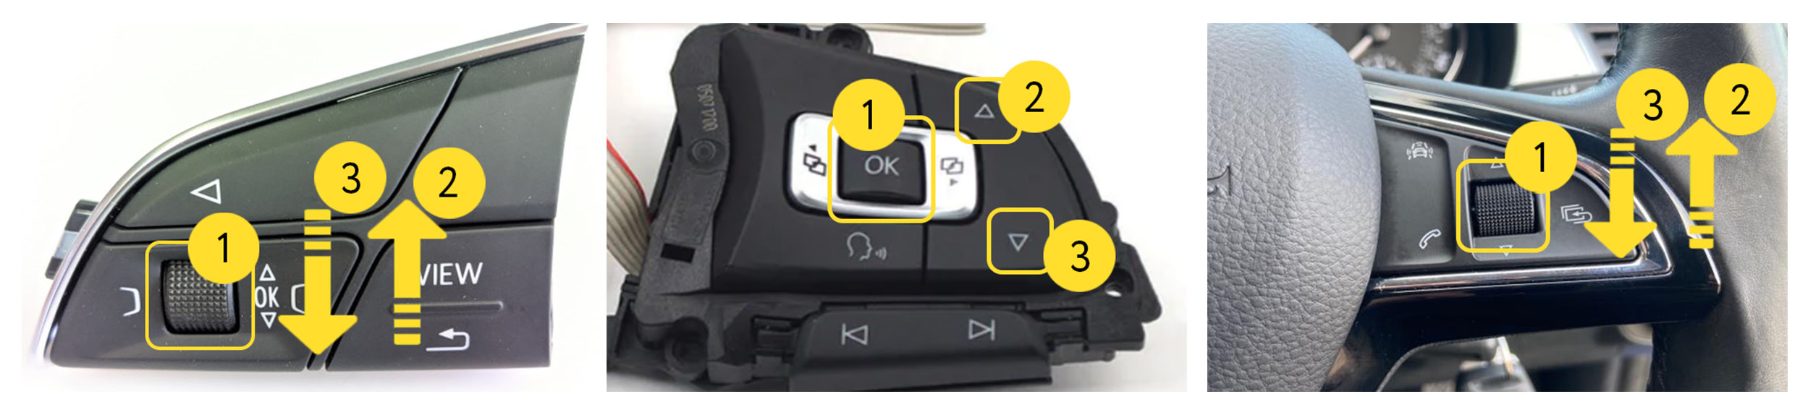
There are 3 types of steering wheels and button sets, so check the picture to figure out which buttons you need to work with.
“Button 1” – press and hold for 6 sec. to enter settings mode. Once in this mode, your signal (hazzard) lights will start blinking, and this will continue until you exit the setting mode.
“Button 2” and “Button 3” (or scroll up and scroll down) change the percentage setting that you want to be displayed on the dashboard. Ex. 2000 rpm = 20%, 5000 rpm = 50%. If the dashboard points to Ready (for cars with Start/Stop system) or off - it mean that the filter is turned off.
To exit the settings mode, you need to press “Button 1” or leave it for 3 sec. or more and it will exit automatically. Upon exit, the last stored percentage setting will be saved. Setting is not lost if the car is left with not battery.
N.B. The calculated fuel consumption will be affected from the filter’s setting, accordingly.